I have started another with a deep cell for resin but have put it to one side to send off for hallmarking. Today's ring can go off for hallmarking too, I usually have work hallmarked before I finish it and almost always before I enamel it - although it is possible to have vulnerable pieces laser marked.
enamel jewellery, hand-crafted silver jewellery, art clay silver, enamelling, Whitby Museum
Thursday 28 January 2010
Silver ring
Today I have made a silver ring from a bit of wire that was already shaped into a spiral and a few bits of wire with balled up ends, joined onto another piece of round wire to make the ring shank. I am really enjoying this ring making challenge but at some point will have to start making some to sell!
Wednesday 27 January 2010
More rings
Ugthorpe hoard
Today I have been to a brilliant talk at the museum by Roger Dalladay. He talked about the Ugthorpe hoard; a collection of coins found some time ago and eventually acquired by the museum. He began by explaining a bit about the Roman monetary system. He then showed pictures of the coins together with pictures of statue heads of the Emperors and explained the imagery in a really clear and entertaining way, putting all the Roman Emperors into context. It was a thoroughly enjoyable talk and I will have to have a closer look at some of those coins now!
Friday 22 January 2010
That big faux bone ring
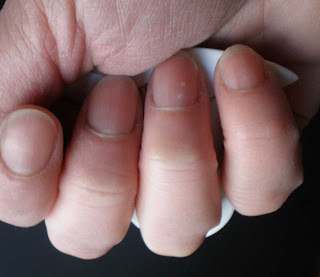
Here is another view of one of the rings I posted yesterday. I don't really like the finished thing but it has been an interesting exercise in working out how to construct and assemble it. First I roughly cut the circle in the faux bone. I then measured it on a ring mandrel and used that as my 'size' for the art clay silver ring. I rolled out the strip for the ring band and made the ring with the texture on the inside (it has text inside the band) and set it aside to dry. I then rolled out a sheet of clay and textured it to match, cut the side plate, dried it and assembled and fired the art clay silver. I had also made a little art clay silver stamp - this is my initials in reverse done with a photo polymer plate and it had a short post with a knob on it. After firing I added a pin to the back of the plate using osp and re-firing the ring part with the post supported in a bit of kiln fibre, so that I could use the pin as a rivet (it shows on the previous picture). I cut the texture on the top surface where the 'signet' is using a graving tool, the other marks are made using a file I have forgotten the name of (bought it from Robert Dancik). I drilled a hole to take the peg of the signet and warmed the faux bone up so that I could push it in and it is held securely. Filed the end of the peg smooth then inserted the silver ring into the faux bone. I have used a bit of expoxy resin to stick the two sections together as didn't think the one rivet would really be enough - may have been if the fit had been really tight! I then coloured the faux bone using alcohol inks and sanded then back to re-expose some of the white surface and sealed it with renaissance wax.
It has a small area cut out on the other flat surface where I put bits of gold leaf embedded in UV resin - the whole thing is really too messy for my taste but I have learned a lot in making it.
Thursday 21 January 2010
More experiments in ring making
I have spent the past few days experimenting with rings in a variety of materials. Here are a selection of the finished rings. The top left hand ring is resin with little pieces of cut thread embedded into it. The top right hand ring is faux bone, art clay silver and alcohol inks. The bottom right hand ring is faux bone but before I textured it I made a mould and then poured a resin version with red thread embedded in it. I am really enjoying my time experimenting like this, it is always good to take a break from the 'bread and butter' work and play for a while, letting new ideas bounce around the studio.
Wednesday 13 January 2010
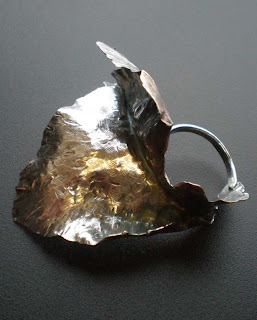
Today's ring
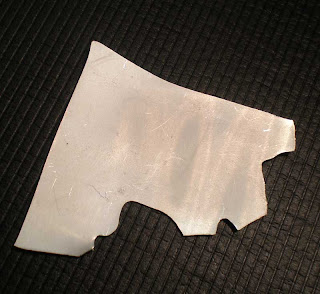
I was planning to go into the museum today but put it off as the weather forecast was so bad - actually turned out not to be as bad as expected, anyway, I did spend the day in the studio working on a few ideas. Here is my Ring a day contribution for today. This is made using a scrap of silver left in the bottom of my workbench after I had cut out the shapes making the 'Necklace for the Plant Collector's wife'. It is made using a technique called fold forming. This is something I was introduced to by Jill Leventon when I spent a fantastic day in her studio in Shrewsbury early last year. Jill will be one of the tutors at the Guild of Enamellers annual conference at Nottingham in April running a workshop on press and fold forming.


Labels:
fold forming,
Inspired by heritage,
Jill Leventon,
Ring a day
Tuesday 12 January 2010
Enamel samples
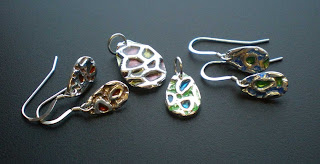
Today I have been preparing enamel samples for a workshop. It seems like ages since I did any enamelling. I also finished a couple of pairs of earrings that have been lying around on the workbench. One pair is the feather pattern I have drawn to make one of my photopolmer plates and is the same design I used as the basis for the 'Travel Light' ring a few days ago.
Monday 11 January 2010
Ring a day, day 5
Well, in theory this is a ring each day for a year! Here is today's offering and as you can see some days I have very little time to spare and have to really think fast, make fast from anything on hand. I was just finishing off in the studio and suddenly remembered I hadn't done a ring today...... grabbed a bit of card that was lying on the bench and here it is. I actually really like it - so think the challenge is doing a good job
Sunday 10 January 2010
Inspired by birds, flight and travel
The ring I have made today is part of my Inspired by Heritage series of pieces. It relates to all the early sketches I did of birds and feathers and the way in which bird motifs are used in all kinds of other objects. I have also been thinking about the way in which birds feature in artefacts from cultures all over the world.
Based on the pattern I used yesterday. This is cut from a sheet of faux bone, filed, sanded and hand engraved (I knew I would find a use for those gravers one day). It is then dyed using alcohol inks and sanded back and polished. There is a bit more variation in colour on the feather than appears in my photograph and because the faux bone is very lightweight it is quite comfortable to wear.
I have a huge debt of gratitude to Robert Dancik, the artist and teacher who developed faux bone for use in this way. He is an inspirational teacher and if you get a chance to attend any of his classes then jump at it! He is due to teach a class at West Dean from 15th to 19th February called 'A bead like no other' and also runs workshops at the Mid Cornwall School of Jewellery from time to time.
I have a huge debt of gratitude to Robert Dancik, the artist and teacher who developed faux bone for use in this way. He is an inspirational teacher and if you get a chance to attend any of his classes then jump at it! He is due to teach a class at West Dean from 15th to 19th February called 'A bead like no other' and also runs workshops at the Mid Cornwall School of Jewellery from time to time.
Saturday 9 January 2010
Ring a day, day 3/09012010
Today I was simply going to make the paper version of this ring and it happened by accident as I was checking that a circle paper punch worked and just picked up an old scrap of paper, originally a discarded template for something. With a bit of folding and curling of the paper I realised that I really liked the shape and form so found a bit of re-cycled plastic and made another version from that.
Studio day
I have spent most of the day in the studio and thought you might like to see where I work.


This is my workbench

with this lovely set of drawers and cupboards overflowing with tools and equipment

this is the main part of the room. These are the benches where my students work when I am running courses although at this time of the year I rarely take bookings so it tends to be like this, overflowing with my own work. In the background you can see some of the kilns I use (although my favourite is just out of the picture)

This is my new torch and behind it my soldering hearth and a large sink I bought at a farm sale years ago. I keep all my glass rods for lamp working in a metal chest of drawers under the table in the centre of the studio and always put them away to keep them clean when I am not using them. I think at the moment the studio is a bit untidy (for me) and put it down to the weather! I am usually really tidy when I am working partly because with most of the techniques I use, like enamelling, you have to be really really clean.
Friday 8 January 2010
Ring a day, day 2
Today's ring is this felt flower. I have had some bits of wool in a drawer for ages, given to me by a friend after a workshop. I made this in two stages. Firstly I wet felted the whole thing then, as I wasn't quite happy with the result, I needle felted at the junction between the main part of the flower and the loop of the ring to strengthen it. I then had another go at wet felting it. I am quite happy with the result and it was a bit of fun this morning before I began my more usual work in art clay silver.
Thursday 7 January 2010
Remember me, ring or pendant
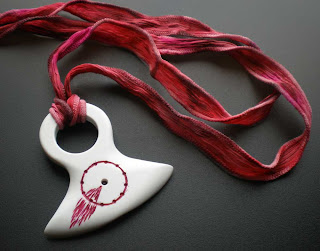
A reference to memory in the circle, flame and the ruby set into the faux bone and the shape inspired by pieces of whale bone from Whitby Museum. The circle is also supposed to reference stitching (although I think I maybe should have drilled and stitched it with red thread). It can be worn either as a ring or as a pendant, shown here on a ribbon hand dyed to match. It is surprisingly comfortable for such a large piece but is also comforting to play with inside the hand.
It is made using Robert Dancik's Faux Bone sawn, filed, sanded and carved then dyed using with alcohol inks and re-sanded. The ruby is a cabochon and is set by drilling a hole slightly smaller than the diameter of the stone, heating up the faux bone so that it becomes slightly soft and pushing the ruby in, then cooling the piece.
Labels:
faux bone,
Inspired by heritage,
memory,
ruby
Wednesday 6 January 2010
Tuesday 5 January 2010
Misty Mawn's blog
I have following the blog of Misty Mawn for a short time and she has just posted a January Art Journal join in kind of thing. From the comments of some of the followers it has obviously happened previously and her pages are so beautiful I have decided to attempt to join in. Beginning next week she has chosen an artist to be inspired by each day. I have given this quite a bit of thought while I was working in the studio and decided on Monet, Hokusai, Ansel Adams, Alphonse Mucha, Gustav Klimt, Patrick Heron and Craigie Aitchison. The Monet choice was partly as it linked it with the Art Bead Scene monthly theme and also with my current preoccupation with snow and birds.
This is my first attempt at making a felt bird. I think it has somehow become a cross between a mallard and a swallow. I only had some odd bits of wool a friend had given me a few years ago and very rarely make or wear anything in wool as I have an allergy to it. I am still trying to work out ideas for a piece relating to all the birds in the museum - and really it should be a charm bracelet but I am fairly confident that will develop eventually.
Monday 4 January 2010
Back to work again
although in reality I have never been away. As I live so close to my studio I have been in there at some point every day over the holiday period. Today though I have decided that I need to be a bit more focussed and disciplined about what I do, now everyone else is back at work too. I have been trying to make a set of glass beads for a bracelet but couldn't quite decide on the exact colour I wanted. In theory I needed only 9 beads but now have the kiln on annealing a fairly large batch. Some of them a light blue with flecks of gold; others or transparent with aventurine old gold frit so look quite dark. I have experimented a bit with transparent and inclusions of fine silver (but had a fairly high failure rate so am not holding out much hope for these) and I ended up by making a few more of my odd bird beads.
I also finally got around to cutting a negative shape in faux bone to use in my press to form another bird shape from a thin sheet of sterling silver. I still haven't really got to grips with press forming. I can see the potential for making multiples of shapes but at the moment still have a preference for casting if I want to produce multiples of anything. All that work and nothing to show you!
I also finally got around to cutting a negative shape in faux bone to use in my press to form another bird shape from a thin sheet of sterling silver. I still haven't really got to grips with press forming. I can see the potential for making multiples of shapes but at the moment still have a preference for casting if I want to produce multiples of anything. All that work and nothing to show you!
Labels:
faux bone,
lamp worked glass beads,
press forming
Art Bead Scene Blog: January Monthly Challenge
Art Bead Scene Blog: January Monthly Challenge is based on the painting La Pie (The Magpie) by Claude Monet. This is a beautifully expressive winter painting.
Sunday 3 January 2010
Snow days
It feels as though we have had an exceptional amount of snow this year and the winter has only just begun. I have never really enjoyed the winter and always been worried about slipping, falling over and all that kind of thing. This year though I have so far enjoyed all the snow. It helps that it fell over the holiday period and I didn't need to go anywhere.
I have taken quite a large number of photographs and put some of them in the slide show at the side of the blog. Here is my favourite picture for today. This is just a few yards along the road from the bottom of my drive. I think a few tractors have been around the road today but very little else. I did go for a short walk along the dale, the farthest I have been for days, but it was snowing again gently as I returned home. Most of the day I have been in the studio with the fire going and plenty to keep me occupied.
I have taken quite a large number of photographs and put some of them in the slide show at the side of the blog. Here is my favourite picture for today. This is just a few yards along the road from the bottom of my drive. I think a few tractors have been around the road today but very little else. I did go for a short walk along the dale, the farthest I have been for days, but it was snowing again gently as I returned home. Most of the day I have been in the studio with the fire going and plenty to keep me occupied.
Fresh from the kiln
These small beads are a new batch I am working on and really enjoying the soft reactive glass. The very odd shaped button is my first attempt using a bead mandrel with two prongs, it looks a bit like an enamelling firing fork but smaller. As you can see I haven't got the hang of this at all - and getting it off the mandrel was a bit of a nightmare so it may be some time before I attempt another.
I might sew it onto a bag I have that originally had a handmade ceramic button that got broken.
I might sew it onto a bag I have that originally had a handmade ceramic button that got broken.
Saturday 2 January 2010
Bird inspired things
Here are a couple of bird inspired bits, relating to my residency at Whitby Museum. The museum has a large collection of Victorian stuffed birds (I am sure there is another name for them!). When I first began my residency I spent quite a lot of time sketching and doodling in that section of the museum, partly as I had always ignored them (a kind of dislike of old stuffed creatures I suppose). Anyway, over the year I have become quite fond of them and developed an obsession with the way in which birds have been used as motifs and patterns on objects everywhere. I made a few glass bird shaped beads which have been in my box of bits since last spring. Anyway, I have now made these. The left hand piece is actually a clasp for a bracelet I am planning. The charm is based upon various ceramic jars and pots in the museum that are long-legged birds. I think they are possibly from Africa originally - but I did also sketch some bird shaped ceramic vessels in the Etruscan museum in Rome while I was on holiday.
The glass bead is my first successful attempt as making a lamp worked glass bead over a silver core.
The glass bead is my first successful attempt as making a lamp worked glass bead over a silver core.
Friday 1 January 2010
Red resin and thread
I have been trying not to work over the Christmas holidays, difficult when my studio is so close to home. Anyway as a Christmas treat to myself I bought a pack of casting resin and a bangle mold. Here is my first attempt, not perfect by any means but I have quite enjoyed making it. I used three shades of sewing thread and mixed it into the resin as I poured the resin into the mould. I have got a few bubbles a couple of which are on the edge so I am not very happy about that and may have to file it down and alter the profile to remove them. I have also sanded it back as I didn't really want the usual high gloss finish. It was really difficult to get the set bangle out of the deep mould but I have since found instructions on a blog that say after it has set to pop the whole thing into the freezer for a short time before trying to remove it.
(I would then of course have to wear gloves to try and wrestle it out of the mold as I can't actually grip anything cold or frozen).
Of course I realised before I started that there was little chance the bangle would fit me as I have large hands that don't flex very tightly but I have found that if I warm the bangle up, by running it under the hot tap, I can flex the bangle just enough to get it on. I don't know whether it will get more brittle with age though? Anyway, it was a fun project for the holidays.
Subscribe to:
Posts (Atom)


